This article explains how to manage template access, submission visibility, and email report notifications in Xenia. You'll learn how to configure these settings to control what your team sees and receives daily.
Overview of Template Access, submission visibility and Notifications
In this article, we're going to cover understanding template access, submission visibility, and email report notifications in Xenia. We will see how template access works, which submissions are visible, and how to set up email report notifications. These settings have a big impact on what your team sees day to day. So let's break it down quickly.
Access Checklists in Operations Tab
To complete this, go to the Operations tab and select the checklist you want to work with.
Navigate to Template Settings
Next, click View and then select Edit.
View Template Information and Privileges
Under Settings, you can view all template details, along with the associated access levels and privileges.
Template Information
The first section is Template Information, where you can name your template and customize it as you like. You can also add a company logo, which will appear on submission reports, and optionally mark the form as a Request Form. When enabled, this template will be available as a selectable option when creating a work order request.
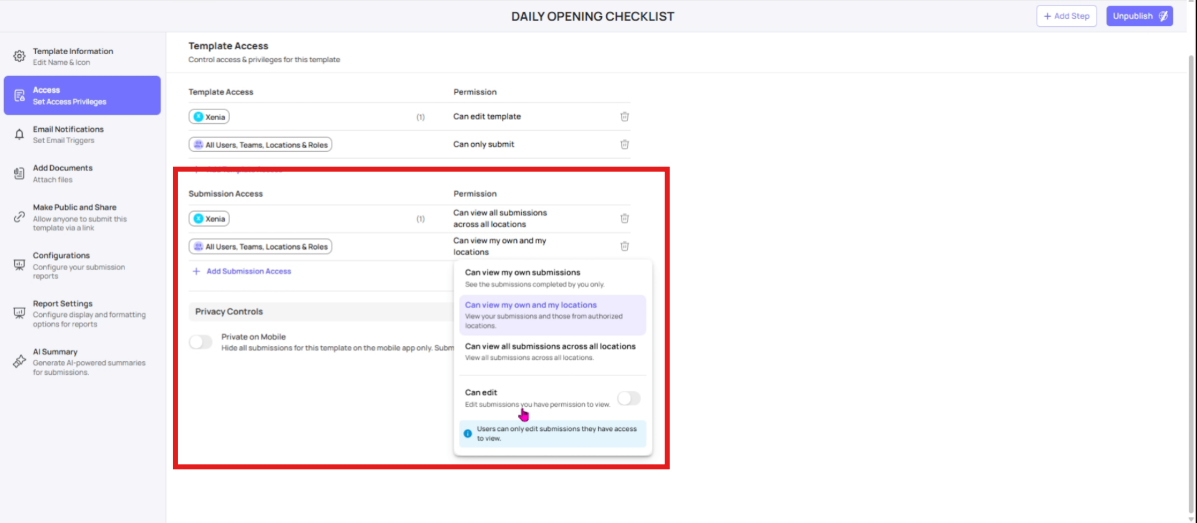
Set Template Access Permissions
Next, in the Access section, you can manage who can use and interact with this template. There are two types of access: Template Access and Submission Access. In Template Access, you can define who has permission to modify or edit the template and who is limited to submitting it only.
Define Editing Rights for Templates
Typically, only the Admin, Owner, or Manager should have permission to edit the template, while frontline users can be restricted to submitting it. For Submission Access, you can
Customize Submission Access
control who can view submissions. Options include viewing only their own submissions, viewing submissions within their location, or viewing all submissions across all locations. This can be customized to fit your organization’s structure and requirements. You can edit your own submissions. By enabling this option, users will be able to edit only the submissions they have permission to view.
Manage Mobile App Submission Privacy
Additionally, you can make the template private on the mobile app, hiding all submissions there while keeping them visible on the web app.
Configure Email Notification Recipients
Next is Email Notifications, where you can specify who will receive alerts whenever this template is submitted.
From the Recipients section, you can choose to send email notifications to specific users, teams, or roles. Keep in mind that notifications are only sent to recipients who have submission access, so it’s important to review this carefully. You can also add additional email addresses here, such as vendors who aren’t users. In the Configuration section, you can choose to group these emails into a single thread or send them as separate notifications.
Enable Public Template Access
Additionally, you can attach one or multiple documents to the template. You can also make the template public, allowing anyone with the link to submit it. The link can be copied directly, or you can generate a QR code for public access.
Configure Submission Reports
You can enable Show Score in the Submission in Progress view, allowing users to see their scores for each section as they complete it. This lets them track their own progress in real time. You can enable Show Score in the Submission in Progress view, allowing users to see their scores for each section as they complete it. This lets them track their own progress in real time.
Enable Step Actions in Submission View
You can also enable Show Step Actions, which will display buttons for Add Note, Attach File, and Create Corrective Task on each step.
Collapse Sections by Default
You can also choose to collapse all sections by default, so that in the submission view, all sections start collapsed and users can expand them as needed.
Understand Submission Mode
Next is Submission Mode, which is a key setting. Selecting No Restriction allows this template to be used for both project-based and ad hoc submissions. It’s important to understand Submission Mode. You can choose:
- Ad Hoc Submissions – The template appears only in the standalone template list and is hidden from project tasks, scheduled work, and attachment options.
- Project-Based Submissions – The template is attached only to projects. It cannot be accessed via the "Templates" tab of the Mobile / Tablet App.
- Both – The template is available for both ad hoc submissions and projects.
Allow Bluetooth Temperature Responses
Additionally, you can enable Bluetooth Temperature Responses, which restricts submissions to Bluetooth-recorded temperatures and disables manual entry of values.
Set Report Display and Formatting
In Report Settings, you can configure how reports are displayed and formatted. You can select which items to include in web, PDF, and email reports, choosing from options like all items, flagged items only, corrective tasks only, or both flagged items and corrective tasks.
Select Show All Items Option
Click "Show All Items".

Configure Timestamp and Scoring
In Report Settings, you can further customize how information is displayed: Show Timestamp – Adds a timestamp to every completed step in both the inbox and report view. Show Scoring Steps – Displays the score for each step. Set Decimal Places for Scoring – Lets you control how many decimal places appear for scoring values. These options help make your reports more detailed and easy to interpret.
Adjust Media Attachment Size
You can also attach media settings for your reports. Here, you can choose the default size for photos—small, medium, or large—so your submission reports display images consistently. This completes how you configure report settings at the individual template level.
Generate AI-Powered Submission Summaries
You can also generate AI-powered summaries for your submissions. By enabling this, you can use custom prompts for each submission, allowing the AI to create concise overviews or insights tailored to the specific template or project.
22. Summary of Template Configuration
These cover all the configuration and settings at the individual template level. Xenia gives you granular control, letting you manage access, reporting, notifications, and display options with great flexibility. Essentially, you can tailor every aspect of a template to match your organizational needs.
This article has guided you through configuring template access, submission visibility, and email report notifications in Xenia. You now understand how to manage permissions, customize notifications, and optimize report settings for your team's workflow.
Need Help?
- If you run into any issues or have questions about bulk locations, reach out to the Xenia support team at support@xenia.team or your Implementation Specialist for assistance.
Comments
0 comments
Please sign in to leave a comment.